The Four Signals That Control Your Data
Your Google tags look for four specific signals to understand what they are allowed to do:
| Signal | What It Controls |
|---|---|
| Analytics storage | Whether GA4 can store cookies for counting visitors and sessions |
| Ad storage | Whether Google Ads can store cookies for advertising and remarketing |
| Ad user data | Whether user data can be sent to Google for advertising purposes |
| Ad personalisation | Whether Google can show personalised ads or build remarketing audiences |
If a visitor accepts all cookies, all four signals are set to “granted,” and your tags work normally.
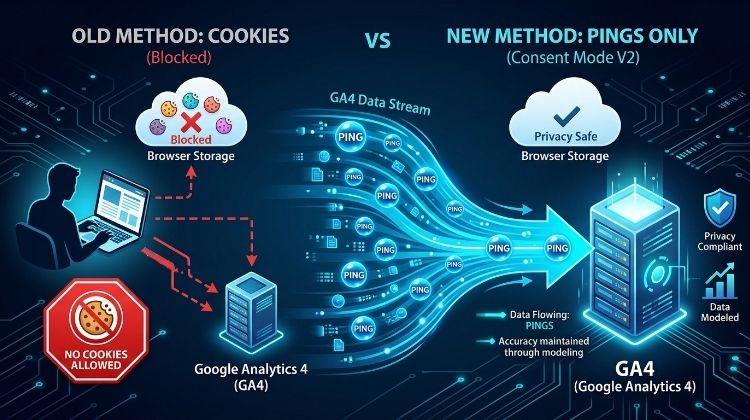
If a visitor rejects cookies, these signals switch to “denied,” and your tags move into a cookieless mode.
What Happens in “Denied” Mode
Here is the clever part. Even when signals are denied, your Google tags can still send anonymous “pings” back to Google.
These pings contain only non-identifiable information like country, device type, and which page the visitor came from. No personal data. Nothing that breaks privacy laws.
But those small pings are enough for Google’s machine learning models to estimate missing conversion data.
In plain terms, you respect user privacy while still recovering up to two-thirds of the conversion data you would otherwise lose entirely.

Why South African Enterprises Need Consent Mode V2
You might be thinking: “I run a South African business. My customers are mostly local. Do I really need to worry about this European privacy stuff?”
The short answer is yes. Here is why.
Google Now Requires It for European Traffic
Since March 2024, Consent Mode V2 has been mandatory for any website serving users in the European Economic Area while running Google Ads or GA4.
If you have even a handful of visitors from countries like Germany, France, or the UK, this applies to you.
What happens if you ignore this requirement?
- Your Google Ads remarketing audiences stop building for those users
- Your conversion tracking becomes unreliable
- Google may suspend conversion tracking features for your entire account
So if your business sells products online, offers services to international clients, or simply gets random traffic from Europe, you need Consent Mode V2.
It Protects Your Marketing Performance
Beyond compliance, Consent Mode V2 helps you keep your data clean and your campaigns profitable.
- Conversion modelling: Google’s AI fills the gaps when users decline cookies. It looks at patterns from people who said “yes” and uses those patterns to estimate what the “no” crowd probably did. This is not guesswork; it is sophisticated machine learning.
- Behavioural modelling: GA4 keeps your reports accurate even with partial data. Without this, your dashboards start showing nonsense numbers.
- Campaign optimisation: Google’s Smart Bidding needs data to work. Without enough signal, your automated campaigns will underperform and waste your budget.
It Helps With POPIA Compliance
South Africa’s Protection of Personal Information Act (POPIA) requires you to get proper consent before collecting and processing personal data.
It also requires you to practice data minimisation—only collecting what you actually need.
Consent Mode V2 gives you a practical, technical way to demonstrate both.
When a visitor says “no,” you stop collecting personal data but still gather anonymous signals.
This shows regulators that you have implemented reasonable measures to protect user privacy while running your business.
It Builds Trust With Your Customers
South Africans are becoming more privacy-conscious every year. People want control over their data. They notice when a website respects their choices versus when it ignores them.
Giving users clear, granular control is not just a legal checkbox. It is good business.
Customers trust companies that handle their data responsibly. And trust leads to loyalty, repeat purchases, and word-of-mouth referrals.
Consent Mode V2 is not just about avoiding fines. It is about running a modern, trustworthy, data-driven business that respects its customers.
Basic vs. Advanced Consent Mode – Which One Do You Need?
Now we get to the most important decision you will make.
Google offers two ways to implement Consent Mode. One is simple but limited. The other takes more effort but gives you real results.
Let us break them down so you can choose the right path for your organisation.
Basic Consent Mode – The Simple Approach
Think of Basic Consent Mode as a straight on/off switch.
Your Google tags are blocked by default. Nothing happens until the visitor clicks “Accept” on your cookie banner.
How it works:
- Default state: all tags blocked
- Visitor clicks “Accept”: tags load and work normally
- Visitor clicks “Reject”: absolutely no data sent to Google
The pros:
- Very simple to set up
- Low technical effort
- No risk of accidentally sending data you should not
The cons:
- You lose all data from users who say “no”
- GA4’s behavioural modelling does not work
- Conversion modelling uses generic Google patterns, not your own customer data
Best for: Smaller businesses, low-traffic websites, or organisations that barely use Google Ads.
Why Google Tag Manager Is the Right Tool for the Job
You could technically implement Consent Mode without Google Tag Manager by adding code directly to your website.
But that gets messy fast, especially for enterprise websites with multiple pages and complex setups.
Google Tag Manager makes your life easier in several ways:
- Centralised control: You manage all your consent settings from one place, not scattered across your codebase
- Built-in consent trigger: GTM has a special “Consent Initialisation” trigger that fires before any other tags. This is critical—if another tag fires before consent is set, you break the spec
- Preview and debug mode: You can test your consent flows before publishing, making sure everything works correctly
- Version control: If something breaks, you can roll back to a previous version with one click

Implementation Roadmap for South African Enterprises
Rolling out Consent Mode V2 does not have to be overwhelming.
Break it into small, manageable phases. Here is a practical roadmap designed for South African mid-sized and enterprise organisations.
Phase 1: Choose Your Implementation Path
You have two options. Pick the one that fits your budget and technical resources.
Option A: Use a certified CMP (easier, costs money)
- Services like CookieYes, OneTrust, or Cookiebot handle everything for you
- They provide ready-made templates for Google Tag Manager
- Monthly fees apply, usually based on website traffic
- Best for teams with limited development resources
Option B: Implement manually (more work, free)
- You build your own cookie banner or use a simple open-source solution
- You write the consent update code yourself
- No monthly fees, but you need developer time upfront
- Best for teams with in-house development capacity
Either approach works. Certified CMPs save time and reduce risk.
Manual implementation gives you full control and saves money. Choose based on your situation.
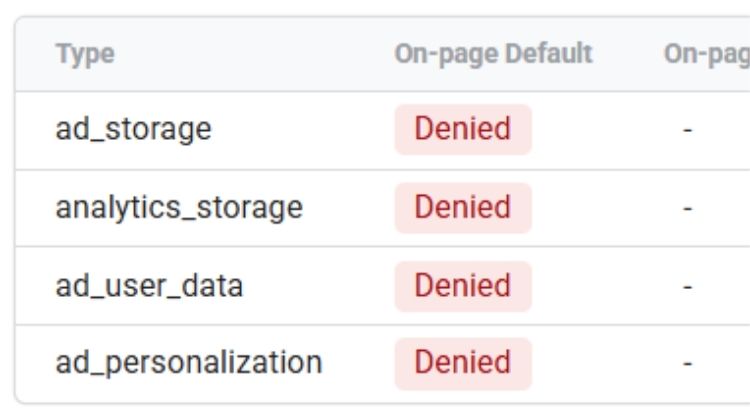
Phase 2: Set Up Default Consent in GTM
Open Google Tag Manager and create a new tag. Set the trigger to “Consent Initialisation – All Pages.” This tag must fire before any other tag on your website.
Set all four parameters to “denied” by default:
- Analytics storage: denied
- Ad storage: denied
- Ad user data: denied
- Ad personalisation: denied
This is your baseline. Nothing happens until a visitor makes a choice.
Phase 3: Add Consent Update Logic
When a visitor clicks “Accept” or “Reject” on your cookie banner, you need to push an update to your Google tags.
If using a certified CMP: The CMP handles this automatically through its GTM template. You just configure the settings.
If implementing manually: You write a simple function that calls gtag(‘consent’, ‘update’, {…}) with the appropriate granted or denied values based on what the visitor chose.
Your developer can handle this.
Phase 4: Test and Verify
Before you publish anything, test thoroughly.
Your verification checklist:
- Open GTM Preview mode. Confirm the consent initialisation tag fires first
- Check that consent status indicators appear on your Google tags
- Test the “Accept” flow. Tags should switch to full cookie mode
- Test the “Reject” flow. Tags should send only cookieless pings
- Run all tests in incognito mode (not logged into your website admin)
Phase 5: Go Live and Monitor (Ongoing)
Publish your GTM container. Then monitor two places regularly:
- GA4: Admin > Data Streams > Consent Mode Status
- Google Ads: Diagnostics > Consent Mode
Allow two to three weeks for Google’s modelling to activate.
You need enough traffic volume for the machine learning to work properly.
If you have low traffic, modelling may never kick in. In that case, focus on getting more visitors before worrying about advanced modelling.